Showing posts with label crafts. Show all posts

Saturday, June 9, 2012

Teacher Gift- Gift Card Flower


It is that time of year- school is ending for the summer and the kids are all saying good-bye to their teachers. And with that comes the inevitable what the heck do I get my kids' teacher to show her how much we appreciate what she has done all year.

This was my son's last year of pre-school so I wanted to get something for all of the teachers at his school- I decided on a Dunkin Donuts gift card but just giving a gift card seemed so boring to this crafty mom. That is was spawned the idea of a gift card flower.

The only supplies I needed were a flower pot, a foam block, two pencils, craft paint, card stock, ribbon shredded paper "grass" and a hot glue gun. For all of the supplies I spent less than $5- the ribbon was the most expensive thing but you could even use fabric cut into strips or magazine pages, newspaper pages or paper cut into strips.

I had my son paint the pot with my craft paint. While it was drying I worked on the flower part. I traced the gift card envelope onto a piece of black card stock and cut it out. Then I cut the ribbon into strips, making sure that they were long enough to fold over. I glued one end of the ribbon onto the card stock and then folded it in half and glued to other end down. I repeated this, alternating between the black and red ribbon. Once done I glued down the gift card envelope. Then I glued the flower to a pencil and took some extra ribbon, made some "leaves" and glued those to the pencil. To make the sign I cut out a piece of white card stock with nifty craft scissors and glued it to another pencil. Once the flower pot was dry I shoved the foam block into it and then stuck the flower and sign in. I put the shredded grass on top to make it look like the flower was planted in dirt.

I also included a thank you note telling the teachers and staff how much we appreciate all that they have done for the past two years.

So there it is, a boring gift (a gift card) made into something thoughtful and pretty.

Monday, May 21, 2012

Angry Birds Birthday Party

Today was the big day- my son's birthday party. The weather was great (though a little hot) and everyone seemed to have fun.

Here is the cake. This cake took me a loooong time to decorate. I now hate frosting.

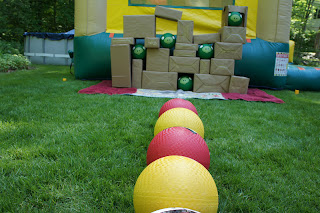
How can you have an Angy Birds birthday party without a life sized game of Angry Birds?

These balls also took me a looong time to make but unlike the cake we will have them forever (or at least until my kids find a way to destroy them). I used this tutorial but decided on playground balls because I wanted something a little more heavy duty.

The boxes are just random boxes that I wrapped in craft paper.

The kids loved it. My son thought I was a pretty cool mom so my hard work was totally worth it.

Here is one of the goodie bags. My son was more excited about the goodie bags than the cake. How annoying considering the cake kept me up till 3 am and these goodie bags took half an hour to make.

So the party was a success and I am one tired mama.


Friday, May 4, 2012

Angry Bird-Day Party Countdown...


When asked what kind of birthday party he wanted, my son replied "Angry Birds".

I have until May 20th to make it happen. 

The first step was the invitations which I made because I am crazy and enjoy crafty stuff like that. Next I am going to make Angry Bird playground balls and paint boxes brown and gray- all for a life sized game of Angry Birds for the kids to play at the party.

Then it is onto coming up with an idea for the cake. They don't make Angry Birds cake pans so it's all on me to come up with something cool. Then I will pray that I can pull it off when I get home from work that Saturday because the party is on a Sunday- I predict I will be up until 2 am and be covered in frosting.

And on top of the stuff I'm making I have to decide what kind of food we're having (and order it- we decided that grilling for everyone is too much of a hassle), buy snacks and drinks, make favor bags and buy stuff to fill them, reserve the bouncy house and buy miscellaneous party supplies (plates, utensils, cups, napkins, table covers, etc). Oh yes, and we just have to have a pinata because the birthday boy made a special request.

Sixteen days and counting...


Monday, February 13, 2012

Valentine's Day Cards- My Kids Are No Fun

Thanks to Pinterest I found a cute idea for Valentines Day cards for my son to hand out at nursery school. His school does not let you bring in candy so I guess crayons it is. Even better, for their Valentine's Day party I am bringing in string cheese- they had a sign up list with that, strawberries and napkins on it. What, no stinking cupcakes? What kind of party doesn't have stinking cupcakes!!


Anyways... My kids were into making the heart crayons for about five minutes which left me sitting there peeling all of the stupid paper off all by myself. Isn't it annoying when you think your kids are really going to enjoy an activity and they end up not caring whatsoever about it?


Oh well, I think they are cute. I love making stuff like this- I will literally cry the day that my son decides he would rather use store bought cards. 

Friday, October 28, 2011

TuTu Trick or Treat Basket (and wand!)


My daughter is going to be a fairy for Halloween. I bought her a beautiful tutu dress with wings from Three Little Princesses and had to make her a basket for trick or treating to match.

Because my brain is melted from being pregnant the most creative idea I could come up with was to make her a tutu basket. It took me forever to make and because of that I am glad I bought her a tutu dress instead of attempting to make one myself (though I did buy the supplies to make her a tutu skirt for when I am feeling up to it).

So, my little girl will be tutu-ed out for Halloween and will be as happy as a pig in you-know-what.

Star Wars Trick or Treat Bag


My son is going to be Captain Rex from Star Wars for Halloween- he really loves Star Wars which is funny because he has never seen any of the movies and I only just recently let him watch the Clone Wars cartoon series.

When he said he wanted to be a Star Wars guy for Halloween I instantly started to think about what kind of trick or treat bag I could make him. Every year I make the kids a bag or basket that matches their costume- it is my little tradition that I will continue to do until the kids decide I am lame and just want to use a pillowcase to collect their candy.

After much searching I found this picture of R2D2 to use as my inspiration. I went to the craft store (actually two craft stores because why would one store have everything I was looking for?) and bought lots of felt (on sale for .25 a sheet), tacky glue, fabric scissors (I finally splurged on real fabric scissors and I am wondering what the heck took me long) and a cheap $1 bag.

Basically, I cut out templates of all the shapes I needed using cardboard from cereal boxes (I cut the boxes so my kids have "paper" to use during arts and crafts time) and laid them out until I was happy with how everything looked. I used the templates to cut out the felt pieces and started gluing away.

I am very happy with how it turned out because believe me, when I sat down to make this bag tonight I really had no idea how I was going to pull it off. I am sure that when my son sees it tomorrow morning he will love it and that is what really matters in the end!

Sunday, September 25, 2011

Decorating the Girls' Room- Slowly But Surely it Will Get Done

Last night and tonight I have been on overdrive to get some crafty things done for the girls' room.

This is my daughter's new lamp. My inspiration came from here, though I ended up not following the directions given and winging it. The ribbon matches the rug and the paint color (somewhat) matches my daughter's comforter set.

Here was the lamp before I updated it- pretty stinking ugly. I was going to throw it away (along with the matching one) awhile ago but I'm glad my laziness prevailed.

This is just a wood crate that I repainted to match the lamp- we've have thins thing since my son was a baby and this is the third time it has been painted. I'll put it on my daughter's dresser to hold random junk.

These are going to go above each of the girls' beds. I was going to make the letters out of buttons but buttons are expensive and I couldn't find the color I wanted. To make these I just stapled fabric onto canvases and then hot glued the painted wooden letters on. The fabric matches the curtains, my daughter's bed skirt and the crib teething rail covers (which I still need to make).

Tomorrow I am going to start to paint an unfinished bookcase that we have had forever but just never got around to painting. I'm just going to paint it white because the girls are going to get new furniture once the baby is out of a crib so I don't want to go and stain it to match what we have now. Once that is done I can finally move the pile of books off of my daughter's dresser and her room will start to look more done. 

Sunday, June 12, 2011

Teacher Gift- My Son's Masterpiece!

My son's last day of nursery school was this past Thursday so I needed to think of something to give his teacher. I am not one for feeling obligated to give people gifts but my son's teacher was just so good with him this year and he really likes her so I wanted to get her something to show our appreciation for all of her work.

I gave my son some glue, paint and buttons and told him to make something beautiful for his teacher. Once his creation dried I put it into a frame and then painted a thank you note on it. He was so proud of his little masterpiece and you should have seen his face when he gave it to Ms. Mary.


I bought a plain brown gift bag from Michael's, some ribbon and some tissue paper and put this gift bag together- looks nice enough. I also wrote a thank you note to his teacher letting her know how much my husband and I appreciate all that she has done for our son this past year and included a $20 gift card to Panera. The kind of person who has the patience to be around preschoolers all day just amazes me- they are all a bunch of saints in my eyes.

So now my little baby is out of school and will be home all day every day to terrorize his little sister and me. What an absolutely wonderful time of year this is...

Tuesday, February 8, 2011

Valentine Cards


Thanks to a recent post at Money Saving Mom showcasing this cute idea for Valentine's Day cards I now have these super cute cards for my son to give out at Nursery School.

I couldn't do lollipops because my son's school is beyond kooky about peanut allergies (I'm talking a sign at the door saying no peanuts allowed) so  had to go with pencils. Still cute but I think lollipops are way cooler than pencils.

Tuesday, November 9, 2010

One Room Down, Two To Go...

I bought a bunch of fabric awhile ago so that I could make valances for three of our rooms and some other odds and ends. I have been working on the computer/my daughter's playroom which included a slipcover for an ottoman and tow valances and I finally finished tonight!

Here is the ottoman slipcover. I have never made one of these before and it was a bit harder than I though it would be. There are some adjustments that I could make but I am so over making slipcovers right now. I am still very happy with the way it came out though.

This is what the ottoman looked like before I covered it- really ugly. My husband brought this monstrosity home when he bought the chair because it was so cheap he couldn't resist buying it- I'm cheap but I think I would have left this thing at the store.

This is the room with the ottoman slipcover and the two valances that I made (don't mind the spots in the picture- my camera stinks). I know the walls are pretty bare but I hesitate to put much on them because this is the room that my daughter plays in and I have a fear of her somehow knocking a picture off the wall and it hitting her in the head (crazy, much?).

Here is what I have left to do:
Family Room- large valance (length of three windows, small valance (one window) and two pillow slipcovers.
Dining Room: large valance (length of three windows) and some kind of a curtain for the bottom of the fish tank holder.

This other stuff will be a breeze to do. I really wish I had done the slipcover last because I was seriously working on it for a month- well, looking at it for a month and dreading working on it.

There is nothing like hosting a holiday to kick your butt into gear!

Wednesday, October 27, 2010

Halloween- I'm Ready for You!

After dropping my son off at nursery school yesterday afternoon, my daughter and I ran to JoAnn Fabrics to get the stuff I needed to make the kids' Halloween Baskets.


Here is my daughter's costume. I bought the owl cape from Etsy- I am so obsessed with how absolutely adorable it is! I bought a brown sweatshirt and sweatpants at Target and used fabric that I bought yesterday to make and owl tummy and cover the ugly writing on the sweatshirt (the fabric I bought is the same fabric that was used to line the cape). Then I used some leftover fabric and hot glued it to the basket I bought.


My son is going to be Spiderman so I made him this basket. I used a Halloween pail that I bought at Target for $1 and then glued on red felt that I bought yesterday (they didn't have any of the regular felt in red that was on sale for .25 so I had to buy the .79 fancy patterned red felt and glue the pattern side down- grrrr). Then I used some good old black puffy paint to make the web design.

The total costs for the baskets (and my daughter's owl tummy) were less than $5 each.

I really love making my kids Halloween baskets every year- it is my little tradition that I know they don't really care about but it makes me feel all warm and fuzzy inside.

Monday, October 25, 2010

Spooky Ghosts


This afternoon my three year old son and I made spooky ghosts to hang from a tree in our front yard.

We made them out of some ball pit balls and daddy's old t-shirts. I used rubber bands to secure the cloth around the balls (I trimmed the extra fabric from the bottoms) and then used some raffia tied in bows to cover the rubber bands. Then I colored eyes and a mouth on with a permanent marker. To attach the twine to them I just poked a hole in their heads with scissors and pushed the knot end of the twine in.

These are all of the ones I did- the ones that my son did are currently being held captive in his playroom because he decided that they were his friends (he colored his with crayons because there is not was I would ever give a three year old a permanent marker).

Next on my Halloween list is making trick or treat baskets for my kids (Spiderman one for my son and maybe a bird's nest one for my daughter because she is going to be an owl). I also have to sew a "owl tummy" on the brown sweatshirt for part of my daughter's costume (there is writing on it that I want to cover up). Oh yeah, and I need to buy candy- I'll most likely do that at Rite Aid.

Friday, October 1, 2010

Mommy Son Time


Today, while my daughter was taking her afternoon nap, my son and I made this Halloween banner to hang on our fireplace.

I cut out all of the shapes and my son colored them. He was gracious to let me color a few. Then I used some jute string that I got from Christmas Tree Shops in the gardening section and strung the shapes up.

My son was so proud to show my husband our creation! I really enjoy doing little crafts with him- they don't look picture perfect but that doesn't matter because in my eyes they always turn out beautiful.

Now on to something that is not beautiful...


This is what happens when you make a Candy Corn Wreath and the weather is unseasonably warm.

The candy corns are slowly melting and some are dropping off of the wreath. The weather is cooling down a little so once the candy has stabilized and the threat of a heat wave is over, I will repair my candy creation.

Tuesday, September 28, 2010

Candy Corn Wreath

I wanted to make a festive wreath for my front door and I saw this in my mailbox.


When my mom had the kids yesterday I went to Michael's and bought a foam wreath and some black wired ribbon (wired ribbon is great for people like me who stink at making bows). Then I bought a huge bag of candy corn at Target.

Last night I got everything together and whipped out my trusty glue gun and came up with this.