Showing posts with label cooks illustrated. Show all posts

Saturday, June 30, 2012

Eggplant Parmesan

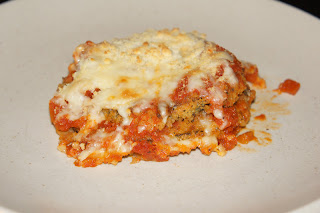
After eating eggplant croquettes and liking them, my husband asked if I could try making eggplant parmesan. I found a recipe for it from Cook's Illustrated which ended up being a bit involved but the results were fantastic. If you are looking for a recipe where you just dump some stuff in a dish this one is not for you but you really just seem to get better results the more time you but into something. 

As the Annoying Orange would say "hey eggplant... knife!"

Sweating it out...

Delicious!

My husband and I loved it (the kids were visiting my mom). The eggplant was cooked to perfection and the homemade sauce was very good (though there was a bitter aftertaste which I suspect is from me using dried basil instead of fresh). I will be making this again and I know when the kids try it they will gobble it right up like we did,

Wednesday, March 14, 2012

Simple Beef Chili

Last night for dinner I made Simple Beef Chili from The Cook's Illustrated Cookbook. Just like the name says, it was pretty simple to make but in spite of that simplicity the flavor was top notch.

Ingredients (serves 8 to 10):

2 tablespoons vegetable oil
2 onions, chopped fine
1 red bell pepper (sans stem and seeds) cut into 1/2 inch pieces
6 minced garlic cloves (I hate cutting garlic, more so than even onions)
1/4 cup chili powder
1 tablespoon ground cumin
2 teaspoons ground coriander
1 teaspoon red pepper flakes
1 teaspoon dried oregano
1/2 teaspoon cayenne pepper
2 lbs ground beef (recipe calls for 85% but I used 90%)
2 fifteen ounce cans red kidney beans (rinsed)
1 twenty-eight ounce can diced tomatoes
1 twenty-eight ounce can tomato puree
salt

Heat the vegetable oil in a Dutch oven over medium heat. Add the onions, bell pepper, garlic, chili powder, cumin, coriander, red pepper flakes, oregano and cayenne pepper and cook until the vegetables are softened and starting to turn brown (stir occasionally), about 10 minutes. I prepped the vegetables in the morning during some down time (meaning my kids were zombified by a movie and the baby was strapped to me in the baby carrier) and threw them into a plastic container along with all of the needed spices. When I was ready to start cooking later in the day I just had to toss the contents into the Dutch oven which made things a lot easier.

Turn heat to medium high and add half of the ground beef; break up the meat and cook until no longer pink. Add the rest of the ground beef and cook until no longer pink.

Add the beans, tomatoes, tomato puree and 1/2 teaspoon salt. Bring to a boil and then reduce the heat to low and simmer, covered, for one hour making sure to occasionally stir. After an hour, remove the cover of the Dutch oven and simmer for one more hour until the beef is tender and the chili has darkened in color and has slightly thickened. Season with salt as desired.

Yum, especially with a side of homemade bread (thank goodness for bread machines!). My husband isn't a chili kind of person so he really didn't eat much but that is his loss and my gain because I have a ton of chili in the refrigerator just waiting for me to scarf down today for lunch. If for some reason there is any left over after a couple of days then I'll freeze it so I can stuff my face at a later date.

Disclaimer: This post contains affiliate links.


Friday, September 23, 2011

Classic Pot Roast- Great Time Saving Meal

I hate feeling rushed at dinner time so I love when I find recipes that I can make earlier in the day. The other day I decided to try a recipe that I found on the America's Test Kitchen website for Classic Pot Roast.

Ingredients:

- 3 1/2 to 4 pound boneless beef chuck-eye roast pulled into two pieces at the natural seam and trimmed of  large knobs of fat (I did not do this because the roast I bought was not the right shape- I'll do better next time, I promise)
- 2 tablespoons unsalted butter
- kosher salt
- 2 medium onions, halved and sliced thin
- 1 large carrot, chopped into medium pieces
- 1 celery rib, chopped into medium pieces
- 2 medium garlic cloves, minced
- 1 cup beef broth, plus 1 to 2 cups for the sauce (I used vegetable stock as it was what I had on hand)
- 1/2 cup dry red wine, plus 1/4 cup for the sauce (I omitted this and added more broth as I am pregnant and do not feel like buying wine that I can't drink)
- 1 tablespoon tomato paste
- 1 bay leaf
- 1 sprig plus 1/4 teaspoon chopped fresh thyme leaves (I used dried as it was what I had on hand)
- ground black pepper
- 1 tablespoon balsamic vinegar

***note*** I did not make the sauce as my family is not into sauces. This means that I only used one cup of beef broth plus 1/2 cup to replace the omitted wine and did not use any balsamic vinegar.

Sprinkle the meat with one tablespoon of Kosher salt and let stand at room temperature for about an hour (meat that is brought to room temperature cooks more evenly).

Adjust the oven rack to the lower middle position and preheat the oven to 300 degrees.

Heat the butter in a dutch oven over medium heat. Once the butter stops foaming add the onions and cook until they are softened and starting to brown (about ten minutes).

Add the carrots and celery and cook for five more minutes (don't forget to stir!).

Add the garlic and cook for about 30 seconds, until fragrant (I love the smell of fresh garlic).

Mix in the broth, 1/2 cup of wine (I omitted this and added an additional 1/2 cup of broth), tomato paste, bay leaf and thyme sprig. Bring to a simmer.

Pat the roast dry with paper towels and season with lots of ground pepper. Using three pieces of kitchen twine tie each piece of meat into a loaf shape so that they cook evenly (remind me to buy a better chuck roast next time). Plop the meat on top of the vegetables. Cover the dutch oven with aluminum foil and then put the lid on.

Put the pan into the preheated oven. Cook until a sharp knife easily slips in and out of the meat, about 3 1/2 to four hours, making sure that you flip the meat over about halfway through cooking. Resist the urge to open the dutch oven except for the one time to flip the roast- you'll let out all of the heat which will affect the cooking time.

Once done, transfer the roast to a cutting board and tent with aluminum foil to let rest. Remove the twine and slice. Yum!

I didn't make the sauce, but that doesn't mean that you can't! to make the sauce, strain the liquid from the dutch oven into a four cup measuring cup allowing it to settle for about five minutes. Throw away the bay leaf on thyme sprig and put the strained vegetables into the blender. Skim fat off of the liquid in the measuring cup and then add as much beef broth as necessary to bring the liquid amount to three cups. Pour the liquid into the blender with the vegetables and blend until smooth. Pour the sauce into a medium saucepan and bring to a simmer. Then add the chopped thyme, 1/4 cup of wine and balsamic vinegar. Season with salt and pepper and pour sauce over the meat, saving half to be passed around the table.

The verdict on this dish was that it was really good! The meat came out so tender which is amazing considering what a cheap cut it was. Next time I make this (and there will be a next time) I will do a much better job at picking out the meat. I really had no idea what I was looking for before but now I do. 

Another wonderful thing about this meal is that I was able to prepare it much earlier in the day so when dinner time came around the only thing I had to make was some mashed potatoes (I could have even made those earlier in the day and reheated them but I was tired and lazy). This will be a great cold weather recipe because here in Massachusetts it won't be long before we start seeing the dreaded snow!

Monday, September 12, 2011

Sunday Night Dinner- Roast Lemon Chicken

This week I am in the mood to try new recipes. After looking through my binder of recipes (a mix of recipes torn from magazines, recipes printed from the Internet and Cook's Illustrated magazines) I decided that we would have Roast Lemon Chicken, a recipe I got from Cook's Country.

I chose it for Sunday's dinner because I am trying to use up all of the whole chickens that are in my chest freezer and because it seemed like a simple recipe to cook on a day that I like to be lazy.

Ingredients:

-Whole Chicken (this recipe called for it to be butterflied but I decided to just roast it the normal way)
-3 tablespoons grated lemon zest and 1/3 cup lemon juice from 3 lemons (I only bought one lemon because I didn't read the recipe good enough)
-1 teaspoon sugar
-salt and pepper
-2 cups low-sodium chicken broth (I used homemade stock that was in my freezer)
-1 cup plus 1 tablespoon water
-1 teaspoon cornstarch
-3 tablespoons unsalted butter
-1 tablespoon chopped fresh parsley

Now it's time to cook!

-Put the oven rack to the middle setting and preheat the oven to 475 degrees. 
-Mix the lemon zest, sugar and one teaspoon salt and then rub two tablespoons of the mixture under the skin of the chicken. 
-Season the chicken with salt and pepper and then plop that baby into your roasting pan (try not to use a non-stick pan because it may make the chicken brown too quickly and do not use an aluminum pan as it may react with the lemon juice).
-Whisk together the chicken broth, one cup of the water, lemon juice and the rest of the lemon zest mixture and pour it into the roasting pan with the chicken. 

-Roast chicken until an instant read thermometer inserted into the thigh reads about 170 degrees (cooking time depends on if the bird was butterflied and the actual weight). 
-Move the chicken to a plate and let rest for twenty minutes (letting it rest will allow the juices to redistribute themselves throughout the meat which means you bird will be very tender).

While the chicken is resting it is time to make the sauce.

-Pour all liquid from the roasting pan into a saucepan (about 1 1/2 cups) and try to skim off as much fat as possible with a spoon. 
-Cook liquid over medium high heat until it has boiled down to about one cup of liquid.
-While the liquid is cooking down, whisk the one teaspoon of cornstarch into one tablespoon of water and then add it to the saucepan making sure to mix it in well.
-Simmer the sauce until it has thickened a bit and add in the butter and parsley. Season to taste with salt and pepper.

The chicken came out really good but I am pretty sure it would have had more of a lemon taste if I had actually read the recipe and bought three lemons instead of just one. The sauce was very good too though my husband wouldn't touch it because he is just not into gravy.

Friday, August 12, 2011

Homemade Focaccia Bread- This Recipe is a Keeper!


Meet my yummy homemade focaccia bread- so good in fact that my picky husband loves it.

I guess I shouldn't say it's my bread because I go the recipe from America's Test Kitchen (a cooking show made by the creator's of Cook's Illustrated magazine which is my all time favorite and the only magazine I pay an arm and a leg to subscribe to).

The recipe is here, you do need to sign up for their site but it is completely free to do so and allows you free access to this seasons's and last season's recipes (there a a ton that I printed out and want to try).

I know when you read through the recipe it may seem like a lot of steps, but it really isn't so bad and this bread is pretty much fool proof- take it from me because I am horrible at getting bread to rise properly.

Now, I know the recipe is for rosemary focaccia but I made mine plain because honestly, I didn't want to buy fresh rosemary at the grocery store. It tastes great without it but I'm sure it tastes great with it too. A word of advice though- the past two times I have made this my dough was very sticky so make sure when you get to the part where it says to lightly flour your counter that you really, really flour your counter well (and your hands). Also, the olive oil is a large component in the final taste of your bread so make sure you use a good quality olive oil (I used Zoe Organic Extra Virgin Olive Oil- I got it from Amazon awhile ago and have been very pleased with it so far).

This recipe is for two loaves of focaccia and in my house here is how we consume it- one is eaten at dinner and one is eaten the next day entirely by me (hey, I'm pregnant- I'm allowed to indulge sometimes). Yum!

Disclaimer: This post includes my affiliate link to Amazon.

Tuesday, July 19, 2011

Mashed Potatoes- Here's a Tip...


I made mashed potatoes for dinner to accompany our pork tenderloin. I really love mashed potatoes but they never seemed to come out right when I made them.

Then I read an issue of Cook's Illustrated that solved my problem (that magazine makes me swoon). Instead of boiling the potatoes, you steam them!

Steaming the potatoes cooks them evenly all the way through which means no gross lumps and it leaves in the potato flavor (boiling them literally boils out the flavor and many of the nutrients).

It is really easy to do- put a large pot of water on the stove and bring to a boil. Place a metal colander inside of the pot, put the cut up potatoes (I cut mine into one or two inch pieces depending on the size of the potatoes I am using) into the colander and then place a lid on top.


I steamed my potatoes for about 15 minutes but it all depends on how many potatoes you are using and how big the cut up pieces are. Just dump your hot potatoes into a bowl and make your mashed potatoes as you usually would.

I promise you, steaming potatoes is the way to go and makes mashed potatoes completely fool proof.

Thursday, February 24, 2011

The Most Wonderful Pizza Dough Ever!

Tonight I made pizza using a dough recipe from Cook's Illustrated and it came out really good- more than really good, it came out just wonderful!

I recently bought myself a subscription to Cook's Illustrated and it cost a lot more than I have ever paid for a magazine but it was so worth it. The recipes in this magazine are all winners and I have learned so much through the three issues I have received so far. I am not getting paid to say this, no one at Cook's Illustrated even knows who I am- I just really love this magazine and I urge anyone who likes to cook and who loves to make really good food for their families to at least sign up for a free trial issue (you can write cancel on the bill and won't owe any money).

So, on to the pizza. I used this recipe (just the dough part). I know it seems a bit weird to make your dough three days before you are planning on having pizza and letting it rise in the refrigerator for all of that time but it really is worth it. It actually works out so well doing it this way because you make the dough earlier in the week when you have a little time and then when it is pizza night you pull the dough out of the fridge an hour before you want to make your pizza and you're set.

For a little back story on my pizza making past- my husband and I bought a pizza stone awhile ago and every time we tried making pizza it stuck to the stone and tasted blah. This is why we were so amazed with this recipe- the dough did not stick at all (even with minimal flour between it and the pizza stone) and the crust was crispy and tasted like Papa Gino's pizza crust.

The only thing I want to change the next time is using different cheese. We used Kraft mozzarella and it tasted so bland compared to the awesome crust. Maybe I can try real mozzarella cheese or a blend of different cheeses to get the taste I want. My goal is to make a pizza that far surpasses any take out pizza we can buy.

In conclusion to my rantings of a mad woman, this recipe for pizza dough is a keeper- I swear it is better than any other recipe out there!

Sorry that there is no picture but this pizza was scarfed down pretty quickly.

Friday, January 28, 2011

Cooks Illustrated, How I Love Thee!

I have a confession to make- no, I have never starred in a sex tape (get your mind out of the gutter).

I am a wannabe foodie.

You would not be able to tell by the caliber of my cooking but I love recipes and even more than that I love learning about how ingredients work.

Recently I splurged on myself and bought a subscription to Cooks Illustrated ($25 for 6 issues- holy crap!). I am in love. I can honestly say that it is the only magazine that I read from front to back, soaking up all of the wonderful articles. I totally swooned at the most recent issue because there was a whole article on pizza dough. Through much trial and error the author found the perfect recipe for dough and I cannot wait to try it. And not only is the recipe provided but the why behind the recipe is explained- how the yeast works and why refrigerating the dough during rise time makes a more flavorful crust. I feel so nerdy when I babble on about such things to my husband but it is just so interesting to know how and why each ingredient is used in a recipe.

I do yearn for when I will have time to better hone my cooking skills but for now I will just continue to build on my food knowledge and making new recipes here and there when it is feasible. Even just trying a couple of new recipes in the past few weeks has opened up my cooking repertoire. It is hard now with two young children, but I want to be excited about cooking dinner and not be rushed to just make something to eat.

But yes, I am guessing I will be a foodie wannabe for awhile- or at least until my kids are old enough to never want to be home because they think their parents are dorky (in plain English I mean when they are teenagers who have their driver's licenses).

For a free trial issue you can sign up here. I just have to warn you though, you may get hooked like me and then will cough up $25 for a subscription when you usually never pay more than a few dollars for a magazine subscription.