Showing posts with label cheap recipe. Show all posts

Monday, January 21, 2013

Freezer Cooking- Bean and Rice Burritos

The chili I made a couple of weeks ago is gone so I needed to make something else for my lunches.

To keep up the spicy theme, I decided to make bean and rice burritos. They are really good and freeze well- and gosh darn it, I suppose they could even be considered healthy!


First, I made a batch of homemade refried beans. Let me tell you something- refried beans from a can are total crap and have the taste to match. If you want some real refried beans that are utterly delicious then you need to make your own. I used dry beans for mine because they are cheaper and way more healthy that canned beans.

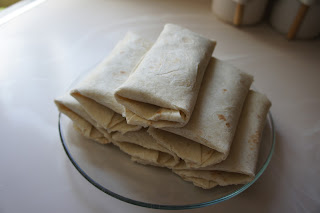
Once the beans were done cooking and mashed up into perfection, I popped them onto some whole wheat tortillas along with some brown rice I seasoned with chili powder, cumin and paprika and rolled those babies up.


I only yielded six burritos from my cooking session as I ran out of tortillas (my 3 year old has been snacking on them) but if I had more I could have made at least four more burritos. These will make a great quick lunch for me and are a great small portions size.

Tomorrow I hope to make a huge batch of waffles for the freezer- I will just have to keep the kids away because they literally try to scarf them down as fast as I can make them!


Tuesday, April 24, 2012

Homemade Chicken Stock "Recipe"

Here is my recipe for homemade chicken stock, though I wouldn't actually consider it a recipe because I basically just throw some stuff in a pot with no regards to such things as measurements.

First, throw all of your chicken carcasses and leftover veggies (carrots, onions, celery) into a large pot. If you don't have all of the veggies I listed, don't worry. Just use whatever of the three you may have or none at all, what really matters is the chicken. I also throw in a couple of bay leaves because they seem to make it taste a notch better. Fill the pot with enough water to over everything and bring to a simmer. The question of how long to simmer everything is really up to you- do it until the stock smells and tastes good. You can make it as potent as you want. The picture above was taken awhile ago- yesterday  when I made my stock I used two chicken carcasses so my pot was much fuller.

If you are going to be gone all day and still want homemade stock you can just throw everything into a slow cooker on the low setting. It still comes out great and if need be if the stock is not potent enough you can always reduce it in a pot after the straining process.

Once your stock has the desired flavor it's time to strain in. This is my straining contraption- I place a colander in a pot. Pretty high tech, huh? To make sure you strain all of the small bits out you can you cheesecloth (the best way to do it) or be ghetto like me and use paper towels (just make sure to change them often). Have a plastic bag handy for all of the scraps. Once the stock has been strained let it cool on the counter a bit and then place in the refrigerator to completely cool.

If for some reason you decide you want your stock to be more potent you can just simmer it on the stove until it has your desired taste. That is what is great about making it yourself- if you simmer down the store bought stuff it becomes way too salty because of all the salt they add to it.

Once cooled the stock will be jelly like; this is normal, though it looks kind of weird. When you heat it up it will turn back into a liquid which is good because I doubt my family would be into chicken jello. Skim any fat off of the top and your stock is ready to rumble!

When I make homemade chicken stock I portion it out into plastic containers and pop them into the freezer so that I have stock ready to use in recipes (I sometimes take the frozen stock portions and put them all into a large freezer bag). Today I ended up with eight cups of stock (a 3 cup portion, a two cup portion and three 1 cup portions) which was yielded from two chicken carcasses and a bevy of carrots, celery and onions (all leftovers from various food preps). You may end up with more or less depending on how many carcasses you have and how long you simmer your stock for.

I'm not sure how much eight cups of stock would cost in the store but this is some high quality stuff with no added weird ingredients- just water, chicken, carrots, celery, onions, and bay leaves (I don't add any salt to it until it get used in a recipe). Plus it was basically free because I used items to make it that would have normally been thrown out.

It is frugal and gourmet all rolled into one!

Thursday, April 12, 2012

Homemade Bean and Rice Burritos


I have been obsessed with burritos lately. First I was buying the cheap fifty cent ones at Stop and Shop but then realized there must be a reason why they only cost fifty cents so I started buying $1.79 ones at Whole Foods. They are delicious but a little expensive so I decided to make my own.

I made my burritos with brown rice, homemade refried beans, flour tortillas and lots of chili powder, onions and cumin. I based my recipe very loosely on this one, as in I completely abandoned the recipe and just started pouring spices into the pan (I love spicy food- love, love, love).

How did they turn out? I think they are very good. I overcooked the refried beans a bit so next time I will make sure they aren't as dry. On the opposite end of the spectrum I undercooked the brown rice so it was a tad crunchy so next time I will not be oblivious to the fact that I need to taste it to make sure it's cooked right before using it in a recipe. I think I may buy whole wheat tortillas next time to pump up the health factor and maybe I'll get crazy and add some corn.

I made six decent sized burritos which if bought from Whole Foods would have cost $10.74. From my estimations (don't hold me to this because I am not one for figuring out food costs) I spent about $4 on ingredients for a monetary saving of almost $7. The time it took to make this was not bad at all and I know next time it will take even less time as I sort of know what I'm doing now. It's also nice knowing exactly what is in the food I'm eating so that counts for something in the algorithm of making versus buying.

Wednesday, October 5, 2011

Homemade Chicken Soup- A Really Frugal Meal!

We had roasted chicken for dinner the other night which came out awesome. I decided, since I am somewhat getting back into my cooking groove, to use the leftovers to make homemade chicken soup.

Yesterday morning, after breakfast, I took as much meat as possible off of the chicken carcass to use in the soup and put it into a bowl in the fridge. Then I proceeded to take all of the skin off of the carcass- why you may ask? Because I decided to go all out and make my own chicken stock.

I threw the chicken carcass into a large stock pot along with a quartered onion, a couple of bay leaves, carrots and celery ends and then filled the pot up with enough water to almost cover the chicken. I simmered the chicken for I don't even know how long- I suppose you just kind of know when it is done. The smell that emitted from that pot made my house smell wonderful!

I set up my straining contraption which consisted of a small pot and a colander with a paper towel in it (you can also use cheesecloth which is probably way better but I didn't have any on hand- just make sure you change the paper towels out frequently). I scooped out the large chunks of chicken and vegetables with a large slotted spoon (hence the Target bag- I have so many Target bags in my house that I am starting to this I have a problem) and then slowly poured the rest of the chicken stock into the colander to strain the smaller pieces of food out.

Here is what my chicken stock looked like after straining. I let it cool on the kitchen counter for awhile and strained off as much fat as possible. Then I put the covered pot into the fridge until I was ready to cook.

Cooking time! I put the pot on the stove on medium-low and added the chicken meat that was in the fridge, chopped celery, chopped carrots and salt and pepper. I let the soup simmer for awhile until the carrots and celery were tender (there was that wonderful smell again). I added cooked egg noodles and let it all simmer for a bit longer while my rolls cooked in the oven.

Here is the final product- it was simply delicious and we only had a little leftover which I had for lunch today. Both of my kids liked it and my husband loved it so I felt all warm and fuzzy inside. Now that it is getting colder out I will be making a lot more soup- maybe next time I will make a double batch and freeze some.

I don't really know what the actual cost of this meal was but the chicken we used was about five or six dollars (on sale for .79/lb) of which we were able to use use for two meals including the soup, the carrots and celery were from a meal last week and were about to go bad, the onions were something I had on hand, the bay leaves were already in my pantry and the egg noodles were free from a sale awhile ago. So in other words it was really cheap. A great tip I have for anyone who want to start making their own stock is to save chicken carcasses, carrot ends, celery ends, onions, etc. in a big freezer bag in your freezer, this way you will always have the ingredients you need on hand and won't be throwing anything away.  

Friday, September 16, 2011

Quick, Easy, Healthy and Cheap Recipe

Last night my husband had to work very late which threw off my plan for dinner. 

I was going to make a new recipe from Rachel Ray Magazine but I wanted my husband to try it too so I scratched that one. I could have just made the kids something quick but I was hungry and wanted a real meal.

That is when I decided to go to my old standby recipe- Parmesan Tomato Spaghetti. It is the easiest recipe (if you even want to call it a recipe) and is healthy and cheap too. Plus, my kids love it which is amazing because they can be pretty picky.

The ingredients I use are whole wheat spaghetti, a can of diced tomatoes, parmesan cheese, olive oil, salt and pepper. The pasta was free and the tomatoes were most likely less than .50 a can.

Pour the tomatoes into a pan and season with salt and pepper. You could also add whatever else you have on hand such as onion, peppers, spices, etc. Simmer tomatoes to cook down. As my tomatoes simmer I like to chop them up a bit because my family doesn't like big chunks. While simmering the tomatoes, cook the pasta according to the directions on the box.

Here is what my tomatoes looked like after simmering- yum!

Drain cooked pasta and dump into a bowl. Add olive oil and mix together. Then add your tomato mixture and mix it all up so that the tomatoes are evenly distributed. Add as much or as little parmesan cheese as you want and mix. That's it- your yummy spaghetti is done!

Here is what my dinner looked like- I love parmesan cheese so much that I added a lot more to my pasta.   I also had some string beans and a piece of whole wheat bread with butter.

In case you're wondering what I feed my kids, here is one of their plates. My kids are not big on the veggies so I just put one string bean on each plate and make them at least try a tiny bite. I gave each of them half a pear to make up for their lack of vegetables. To round it out they each also got a piece of whole wheat bread with butter and a Simply GoGurt. I am not big into making separate meals so my kids pretty much eat what my husband and I eat.

So that was it- a quick, easy, healthy and cheap recipe that everyone enjoyed.