Showing posts with label dairy free recipes. Show all posts

Tuesday, April 24, 2012

Dairy Free Waffles

I have been on a search for a dairy free waffle recipe that tastes good and I finally found one!

I made this recipe this morning but substituted soy milk for the milk and non-dairy spread (I use Earth Balance which I buy at Whole Foods) for the butter. I only made a half batch because I wasn't sure how they were going to turn out.

They came out delicious and you can't even taste the soy milk which is great because I hate soy milk. Why do I use it you may ask? Well, it just seems to have a closer consistency to real milk so it works well in recipes- much better than the rice milk I was using before (rice milk is very watery). My kids even liked them. You have no idea what a big deal this is because this is the first time the Alli, who is two, has ever eaten a non-round waffle (I usually buy the Nutri-Grain Eggo's).

If you want to make them healthier I'm sure you could substitute some of the flour for whole wheat flour but I'm not going to mess with a good thing, especially with picky kids in the house (though maybe white whole wheat flour would go undetected by them). Next time I'm going to make a big batch and freeze some for quick breakfasts (just pop the frozen waffles into the toaster to heat up).

I am so excited that I can eat waffles now and can't wait to try this recipe without substitutions once I wean Jilly Billy from breastfeeding (six and half months to go).

Homemade Chicken Stock "Recipe"

Here is my recipe for homemade chicken stock, though I wouldn't actually consider it a recipe because I basically just throw some stuff in a pot with no regards to such things as measurements.

First, throw all of your chicken carcasses and leftover veggies (carrots, onions, celery) into a large pot. If you don't have all of the veggies I listed, don't worry. Just use whatever of the three you may have or none at all, what really matters is the chicken. I also throw in a couple of bay leaves because they seem to make it taste a notch better. Fill the pot with enough water to over everything and bring to a simmer. The question of how long to simmer everything is really up to you- do it until the stock smells and tastes good. You can make it as potent as you want. The picture above was taken awhile ago- yesterday  when I made my stock I used two chicken carcasses so my pot was much fuller.

If you are going to be gone all day and still want homemade stock you can just throw everything into a slow cooker on the low setting. It still comes out great and if need be if the stock is not potent enough you can always reduce it in a pot after the straining process.

Once your stock has the desired flavor it's time to strain in. This is my straining contraption- I place a colander in a pot. Pretty high tech, huh? To make sure you strain all of the small bits out you can you cheesecloth (the best way to do it) or be ghetto like me and use paper towels (just make sure to change them often). Have a plastic bag handy for all of the scraps. Once the stock has been strained let it cool on the counter a bit and then place in the refrigerator to completely cool.

If for some reason you decide you want your stock to be more potent you can just simmer it on the stove until it has your desired taste. That is what is great about making it yourself- if you simmer down the store bought stuff it becomes way too salty because of all the salt they add to it.

Once cooled the stock will be jelly like; this is normal, though it looks kind of weird. When you heat it up it will turn back into a liquid which is good because I doubt my family would be into chicken jello. Skim any fat off of the top and your stock is ready to rumble!

When I make homemade chicken stock I portion it out into plastic containers and pop them into the freezer so that I have stock ready to use in recipes (I sometimes take the frozen stock portions and put them all into a large freezer bag). Today I ended up with eight cups of stock (a 3 cup portion, a two cup portion and three 1 cup portions) which was yielded from two chicken carcasses and a bevy of carrots, celery and onions (all leftovers from various food preps). You may end up with more or less depending on how many carcasses you have and how long you simmer your stock for.

I'm not sure how much eight cups of stock would cost in the store but this is some high quality stuff with no added weird ingredients- just water, chicken, carrots, celery, onions, and bay leaves (I don't add any salt to it until it get used in a recipe). Plus it was basically free because I used items to make it that would have normally been thrown out.

It is frugal and gourmet all rolled into one!

Saturday, April 14, 2012

Dairy Free Chocolate Chip Cookies

I'm not a huge fan of chocolate chip cookies, at least not the chocolate chip part. I was the kid who would eat around the chips or make my mom bake some cookies sans chips.

Right now though, after being dairy free since before Christmas, I crave chocolate for the simple reason that I can't really have it.

Bring on the chocolate chip cookies!

I used the Nestle Toll House recipe and substituted shortening for the butter as well as half of the flour for white whole wheat flour. As for the chocolate chips, I used vegan ones that I bought at Whole Foods a few weeks ago. The cookies came out delicious, but at this point it has been so long since I've had chocolate that I could have eaten dirt with chocolate chips in it and thought it was delicious.

I froze a bunch of the cookie dough (rolled in balls) so that the next time I get a hankering for chocolate I can just pop some dough in the oven and the stuff my face with empty calories.

Friday, April 13, 2012

Vegan Chocolate Cupcakes- Yum, Yum, Yum


I know I've posted this recipe before but I'm going to do it again because it it really good- so good in fact that I make it even when I'm not on a dairy free diet.

I used some high end cocoa powder that my mom bought on Amazon and the cupcakes were super delicious but they even taste delicious using good old Hershey's cocoa powder. Unlike other cake recipes that dry out over time this one actually tastes better the next day- very moist and chocolatey.

I decorated them all pretty with purple piped stars and with pink sugar sprinkles but I was too tired at the completion of the decorating to take a picture. The icing was not dairy free so I just ate the bottom parts on the cupcakes while everyone else got the privilege of eating the whole thing.

Thursday, April 12, 2012

Homemade Bean and Rice Burritos


I have been obsessed with burritos lately. First I was buying the cheap fifty cent ones at Stop and Shop but then realized there must be a reason why they only cost fifty cents so I started buying $1.79 ones at Whole Foods. They are delicious but a little expensive so I decided to make my own.

I made my burritos with brown rice, homemade refried beans, flour tortillas and lots of chili powder, onions and cumin. I based my recipe very loosely on this one, as in I completely abandoned the recipe and just started pouring spices into the pan (I love spicy food- love, love, love).

How did they turn out? I think they are very good. I overcooked the refried beans a bit so next time I will make sure they aren't as dry. On the opposite end of the spectrum I undercooked the brown rice so it was a tad crunchy so next time I will not be oblivious to the fact that I need to taste it to make sure it's cooked right before using it in a recipe. I think I may buy whole wheat tortillas next time to pump up the health factor and maybe I'll get crazy and add some corn.

I made six decent sized burritos which if bought from Whole Foods would have cost $10.74. From my estimations (don't hold me to this because I am not one for figuring out food costs) I spent about $4 on ingredients for a monetary saving of almost $7. The time it took to make this was not bad at all and I know next time it will take even less time as I sort of know what I'm doing now. It's also nice knowing exactly what is in the food I'm eating so that counts for something in the algorithm of making versus buying.

Wednesday, March 14, 2012

Simple Beef Chili

Last night for dinner I made Simple Beef Chili from The Cook's Illustrated Cookbook. Just like the name says, it was pretty simple to make but in spite of that simplicity the flavor was top notch.

Ingredients (serves 8 to 10):

2 tablespoons vegetable oil
2 onions, chopped fine
1 red bell pepper (sans stem and seeds) cut into 1/2 inch pieces
6 minced garlic cloves (I hate cutting garlic, more so than even onions)
1/4 cup chili powder
1 tablespoon ground cumin
2 teaspoons ground coriander
1 teaspoon red pepper flakes
1 teaspoon dried oregano
1/2 teaspoon cayenne pepper
2 lbs ground beef (recipe calls for 85% but I used 90%)
2 fifteen ounce cans red kidney beans (rinsed)
1 twenty-eight ounce can diced tomatoes
1 twenty-eight ounce can tomato puree
salt

Heat the vegetable oil in a Dutch oven over medium heat. Add the onions, bell pepper, garlic, chili powder, cumin, coriander, red pepper flakes, oregano and cayenne pepper and cook until the vegetables are softened and starting to turn brown (stir occasionally), about 10 minutes. I prepped the vegetables in the morning during some down time (meaning my kids were zombified by a movie and the baby was strapped to me in the baby carrier) and threw them into a plastic container along with all of the needed spices. When I was ready to start cooking later in the day I just had to toss the contents into the Dutch oven which made things a lot easier.

Turn heat to medium high and add half of the ground beef; break up the meat and cook until no longer pink. Add the rest of the ground beef and cook until no longer pink.

Add the beans, tomatoes, tomato puree and 1/2 teaspoon salt. Bring to a boil and then reduce the heat to low and simmer, covered, for one hour making sure to occasionally stir. After an hour, remove the cover of the Dutch oven and simmer for one more hour until the beef is tender and the chili has darkened in color and has slightly thickened. Season with salt as desired.

Yum, especially with a side of homemade bread (thank goodness for bread machines!). My husband isn't a chili kind of person so he really didn't eat much but that is his loss and my gain because I have a ton of chili in the refrigerator just waiting for me to scarf down today for lunch. If for some reason there is any left over after a couple of days then I'll freeze it so I can stuff my face at a later date.

Disclaimer: This post contains affiliate links.


Tuesday, March 13, 2012

Dairy Free Cinnamon Rolls

I had a hankering for something sweet today so I decided to make cinnamon rolls. I would die for cinnamon rolls, I love them so much, but rarely make them because of the time involved.

I came across Money Saving Mom's recipe for Bread Machine Cinnamon Rolls and thought that I would give it a try. Because my infant has a dairy allergy and I'm breastfeeding I substituted soy milk for regular milk and dairy free spread for the butter. I am weird and abhor frosting so I totally omitted that part.

The rolls came out delicious! Who knew that nasty soy milk could make something so good. As you can see from the picture I crowded the rolls to close together (I was in an epic battle to get my baby to fall asleep in her swing- I came out triumphant after twenty minutes of pacifier stuffing) so they popped up a bit so if you make these, don't do that.

Off I go to stuff my face with dairy free cinnamon rolls (yes, I will share some with the kids even though I don't want to).

Tuesday, January 17, 2012

Dairy Free Snack- Pumpkin Bread


Going dairy free hasn't been that bad, considering this is the third time I've had to do it (darn babies and their milk allergies). The only thing that is different with this baby is that I have less time to cook from scratch. What is a mom to do? Well, when the kids and I made this pumpkin bread I popped the baby in the baby carrier and she was in on the action too.

This is my favorite pumpkin bread recipe and as you can tell from the title of this post, there is no milk in it. If you wanted to get really extreme, there is even a substitution you can make for the eggs so that it is vegan.

I ended up making to smallish loaves of bread for me and a bunch on mini-muffins for the kids. This is not a healthy recipe by any stretch of the imagination due to all of the oil and sugar but it's got to be better than chocolate chip cookies right? Maybe in my lazy mom head I could even justify this as a serving of fruit/veggies...

Saturday, December 31, 2011

Dairy Free Birthday Cake


My husband's birthday was the other day and my two year old daughter and I decided to make him a cake. I wanted the option of eating it so we made it dairy free. I used my favorite chocolate cake recipe for chocolate oil cake (not only is it dairy free but it's also vegan)- I even make this recipe when I am allowed to eat dairy because it tastes really good. It is also a great cake recipe to use in shaped pans as it is a bit dense and does not stick (nothing angers me more than when a cake sticks to the pan no matter how well I prep it).

Since my daughter wanted to use the bundt pan I just made a glaze to pour over the top (I used this dairy free recipe). Since the cake reminded us of a giant doughnut we colored the glaze with blue food coloring and then put tons of sprinkles on top.

My daughter couldn't wait to have a piece so I cut out a small sliver before my husband got home. When my husband did walk in the door, she couldn't stop talking about the cake. I swear you would think she won the lottery the way she was jumping around and smiling. I guess it's the simple things in life that kids enjoy the most.

Friday, October 7, 2011

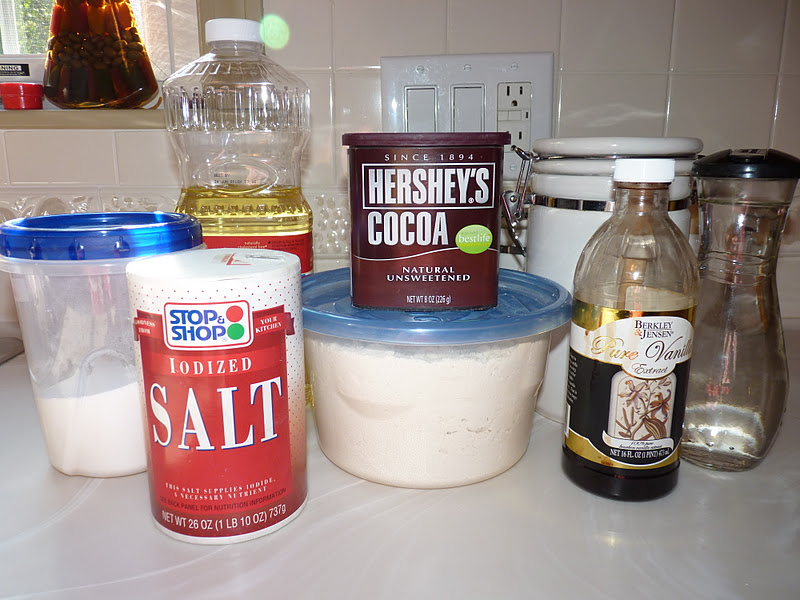
Chocolate Oil Cake

Yesterday morning I randomly decided that my kids and I would make my husband a cake. My kids love baking with me and even though I really don't enjoy baking with them (they are messy and everything takes ten times longer) I still do it because they enjoy it.

My go to cake recipe is for Chocolate Oil Cake. I first made this when I was breastfeeding my son who had a milk allergy. Going dairy free was very hard for me but I refused to stop breastfeeding so I found many recipes that I could safely eat. This recipe was a godsend as it tastes wonderful and made me feel better about not being able to eat many of my favorite foods. Anyways, onto the recipe!

Ingredients:

2 cups sugar
3 cups flour
2 teaspoons baking soda
1/2 teaspoon salt
1/2 cup unsweetened cocoa powder
2 cups water
1 cup vegetable oil
2 tablespoons vinegar
1 teaspoon vanilla

Here are my "helpers"- it's great that they have such short attention spans as they got bored after a bit and wandered off to do their own thing. Thank goodness.

Mix together the sugar, flour, baking soda, salt and cocoa.

Add in the water, vegetable oil, vinegar and vanilla. The batter will be very runny and to be honest, won't taste that great. Don't worry- it will taste great once it comes out of the oven!

Pour the batter into a 9x13 inch pan and bake in an oven preheated to 350 degrees for about 40 minutes. The cake is done once a toothpick inserted in the middle comes out clean.

Waiting, waiting, waiting for the cake to be done. I kept trying to explain to them that it was for daddy and they would have to wait until after dinner to eat it but somehow children just hear what they want to hear and nothing else.

Yum, the finished product. I used this recipe for the icing and it came out pretty good (I halved the recipe). No, it was not anyone's birthday but who doesn't love blowing out candles on a cake?